
ADMINISTRATOR TOOLS
The admin interface provides both administrators and developers with a wide range of tools, services, and documentation resources to manage and extend X2CRM. This module requires administrative level clearance in order to access it. The Admin module contains a considerable amount of utility; This guide is broken down into further sections. Click on a menu item below and you will be directed to that section
Administrator Tools Contents
Admin Dashboard
Customer Support
X2Hub Services
Documentation & Videos
User Management
User Interface Settings
Admin Dashboard
Below is an image of the Admin screen where you gain access to these tools. Clicking on the Admin button on the Top Bar from any screen will take you to this page. You will only see this button if you have been granted Admin privileges for the system.

- Log Viewer provides access to the application logs.
- Process List views a list of running processes on your server.
- Disk Space displays how much disk space has been used.
Customer Support

- X2CRM links you to our main website, X2CRM.com.
- File a Support Case opens a web form where a user may enter all the information about a case and submit. You may also call 1-831-900-5830 Monday through Friday, 8 a.m. to 5 p.m., Pacific Standard Time.
- X2CRM Open Source Support links you to our support forums, X2Community.com.
X2Hub Services
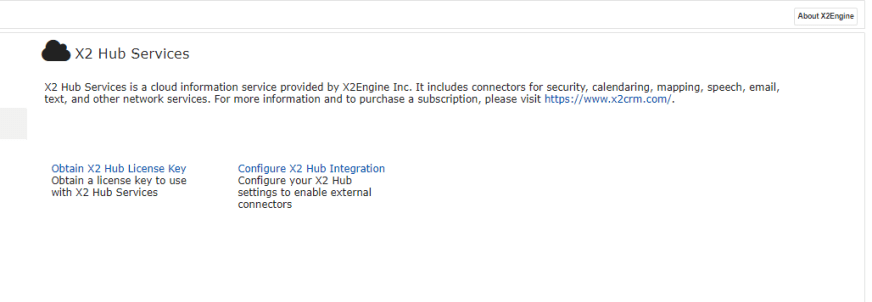
- Obtain X2 Hub License Key explains how to obtain a license key for X2 Hub Services.
- Configure X2 Hub Integration allows you to configure X2 Hub Services.
NEED MORE HELP?
Document & Videos
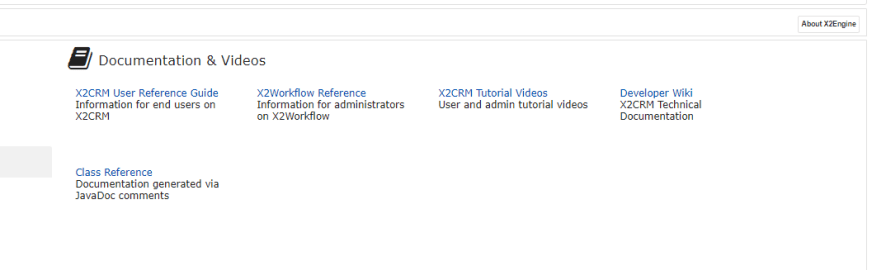
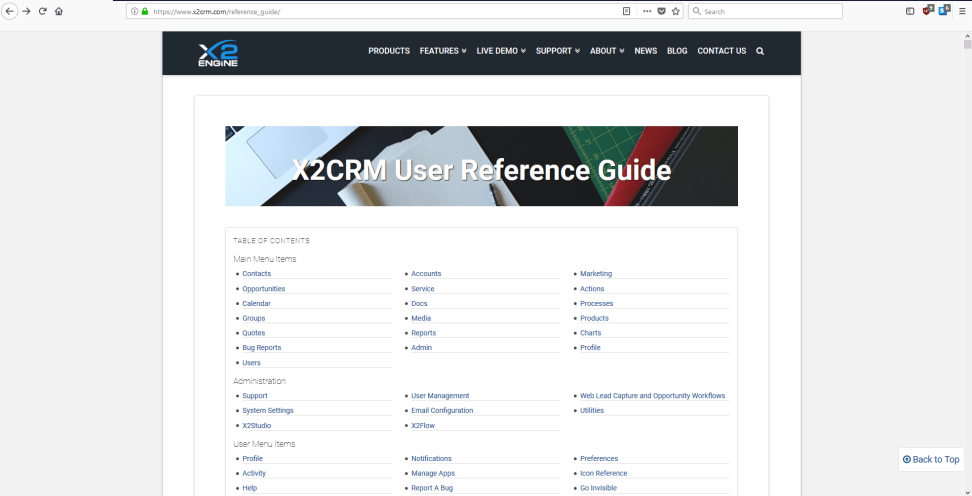
- X2CRM User Reference Guide links you to this document.
- X2 Workflow Reference links to the reference guide specific to X2 Workflow.
- X2CRM Tutorial Videos links you to our video tutorial library.
- Developer Wiki links to X2CRM Technical Documentation.
- Class Reference links to documentation generated via JavaDocs comments
User Management

- Here you can Create, Invite and Manage Users. These are the members of your company, e.g. your sales and marketing teams. Administrators have an overview of their users and the ability to oversee user accounts, including viewing a complete action history, updating contact information and resetting passwords.
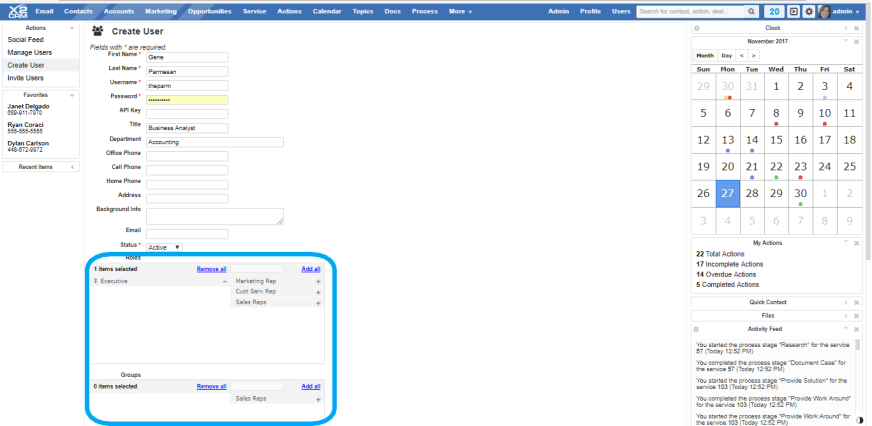
Create Users enables you to initialize a new user in the X2CRM system.
- Clicking the option brings up a new user information form. Enter the required fields of name, username and password, as well as title, contact information and background info. Additionally, set their status as active or inactive.
- All user information can be updated and altered after the user is created. However, usernames cannot be changed.
- Assign the user to different groups and roles in the area highlighted by the blue box. Click the + / – icons or simply drag and drop the appropriate classes. You can assign any amount of groups and roles (which are editable in administration)
- Click create to finalize the user.
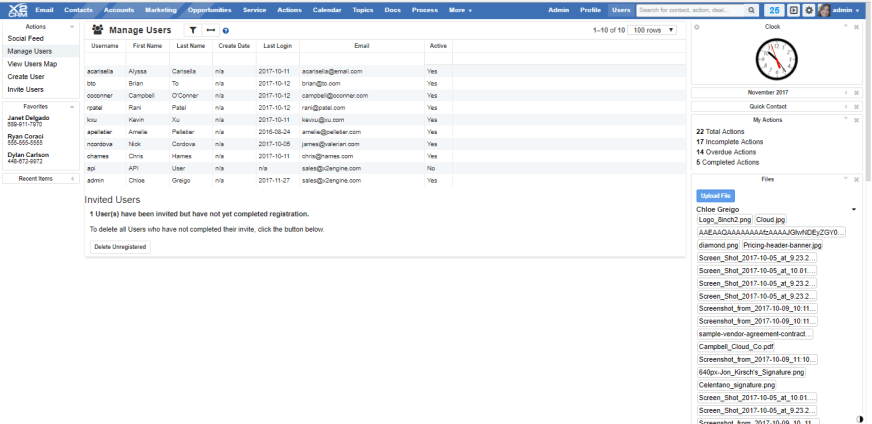
- Manage Users is an overview of all your X2CRM users and members.
- Each of the blank white cells below each column heading are searchable. Enter text in these boxes and hit the return key to search. All matching records will be displayed.The grey boxes are not searchable.
- If you click on an existing username you will be taken to the user detail view.
- Invite User allows you to email an invitation to be added into the X2CRM user base, e.g. for new employees.
NEED MORE HELP?
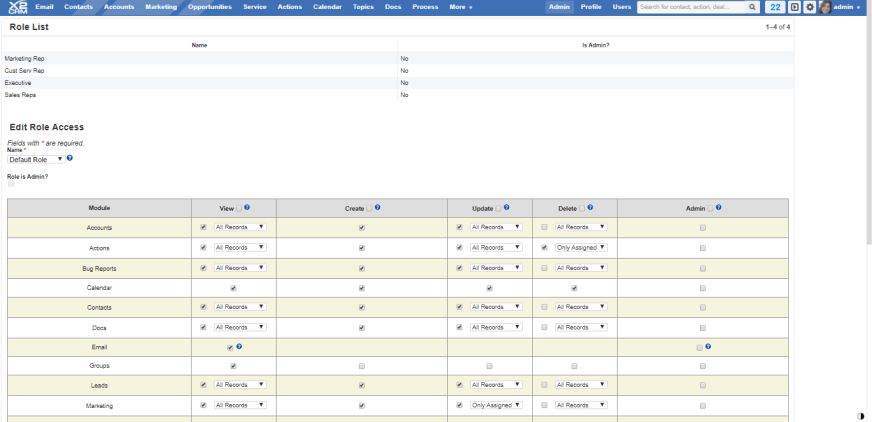
Edit User Permissions and Access Rules allow you a simplified view to change access rules for roles
- Simply select the specific role you would like to edit permissions for from the drop-down menu.
- You’ll have the option to make all users within this role an admin by checking the “Role as Admin?” option at the top.
- On the far left column, you’ll see a list of all the modules within your X2CRM deployment. The columns to the right list different permissions you can choose to enforce for each module, such as create, update, or delete.
- If you check the box in the header for a column (ie: View), you will automatically enable viewing permissions for every module. You can further drill down permission with the drop-down menus within the view, update, and delete columns. Selecting “All Records” will allow users in that role to access all records within X2CRM; selecting “Only Assigned” ensures they only have access to records they are assigned to.
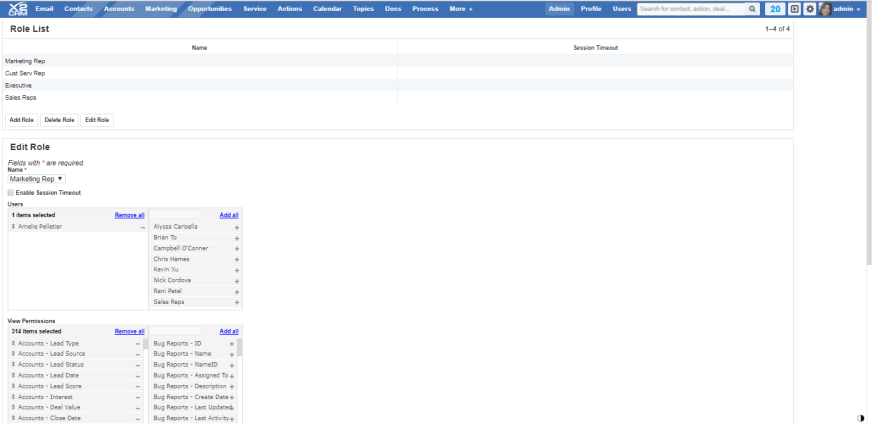
Manage Roles allows you to create and supervise the types of roles you want to classify your staff as, e.g. sales reps, executives, or customer service agents.
- Within the Manage Roles tool, you’ll be able to add permissions on a field type level, so that you can designate what each role has access to.
- Simply drag-and-drop the users, view permissions fields, and the edit permissions fields from the right hand list to the left column.

- Groups link takes you to the Groups tab of the the main X2CRM page. You can set which users of your X2CRM system fall into which role type and also create new groups and add users to those groups.
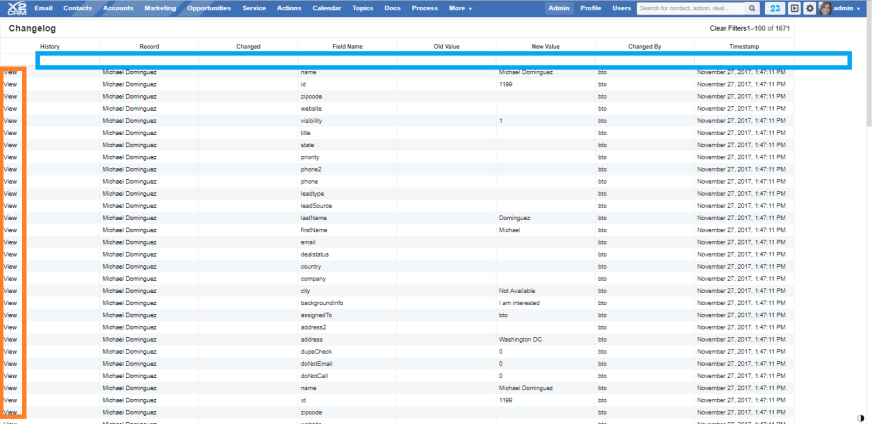
The View User Changelog utility allows you to see an overview of all changes made to the data within X2CRM.
- Easily view a log of which records have been updated, deleted, or created.
- The columns are all searchable. The blank white cells below each column heading, highlighted in blue, are text fields. Enter some text in the box and X2CRM will display a list of all records matching that field.
- If the record is viewable, an option linking you to the record will appear in the first column, highlighted in orange.
NEED MORE HELP?

User View History provides a log of the record pages your users have visited in X2CRM.
- It displays pertinent information like the activity’s timestamp, the record type, a link to the record page, and who was active on that page.
- The column titles, highlighted in the pink box, are all sortable. Click on the grey column title to filter and sort by that criteria.
- Use the Clear View History button, to erase the record of user activity.
- Individual activity instances are not deletable. It’s all or nothing.

- User Location History see a history of where users have been.
- Manage Sessions allows you to see which users are actively on your CRM system at the time. You can toggle whether they will be visible to other users on your X2CRM, or if for some reason you need to end their session, you can do that here.
- User Login History manage X2CRM user account history, including failed and successful logins.
- Manage User Count manage X2CRM user count. This sets the number of users that may be created.
User Interface Settings
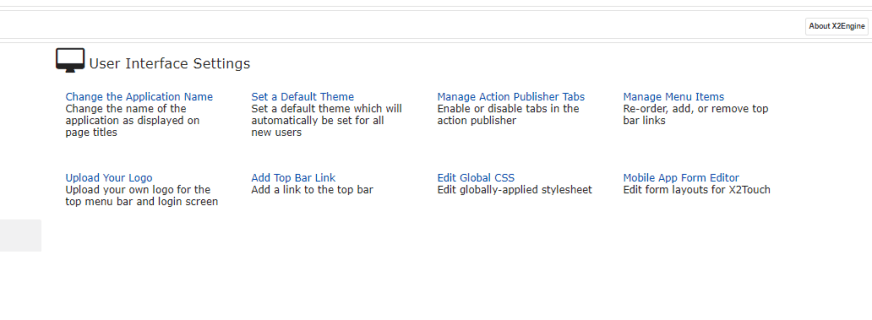
- Change the Application Name changes the name of the application as displayed on the page titles, such as the login screen.
- Set a Default Theme sets a default theme which will automatically be set for all new users. This is an easy way to enforce corporate branding remains consistent across all user accounts.

- Manage Action Publisher enable of disable tabs in the action publisher.
- Customize the available action within the publisher so your users have access to only the most relevant functions within a record.
NEED MORE HELP?

- Manage Menu Items re-order, add or remove top bar links.
- This option allows you to remove and rearrange menu items along the ubiquitous top bar menu in X2CRM, highlighted by a yellow box.
- Drag and drop to rearrange the order of the menu items in the menu highlighted by the orange box. To remove a menu item drag it to the menu highlighted by the green box on the right. Inversely, drag a removed menu item from the green box to the orange in order to add it back to your top menu.
- Alternatively you can use the + / – icons on the right hand side of each item.
- Upload Your Logo upload your own logo for the top menu bar and login screen.
- You may upload a personalized company logo if you so desire. Browse your file folders and select an image. It will be set to 30 pixels tall. After upload, it will appear in the top left corner. You may also set the logo on your login screen.
- The Restore Default Logo buttons will return the logos to the X2CRM logo
- Add Top Bar Link add a link to the top bar
- Edit Global CSS edit globally-applied stylesheet
- Mobile App Form Editor edit form layouts for X2Touch
SYSTEM SETTINGS
X2CRM System Settings helps administrators control the X2CRM data environment. It is essential for the system administrator to understand and manage the settings because they affect every user, team, and data point (such as activity or event) that the system is recording.
System Settings Contents
X2CRM Update Settings
General Settings
Activity Feed Settings
Security Settings
X2CRM Update Settings

- Update Settings:
- This screen contains the information fields necessary for you to receive updates from X2CRM. Place your product key in the field. This allows us to confirm your product status and send you the latest software updates of our consistent and fairly frequent version releases.
- Set the interval for checking for updates.
- Check the box if you wish for X2Engine to periodically check for updates and update automatically if a new version is available.
- Update X2CRM
- Checks whether your X2CRM system is up to date. X2CRM releases updates and improved versions frequently. If an update is available, you will be walked through the steps to acquire it.
General Settings
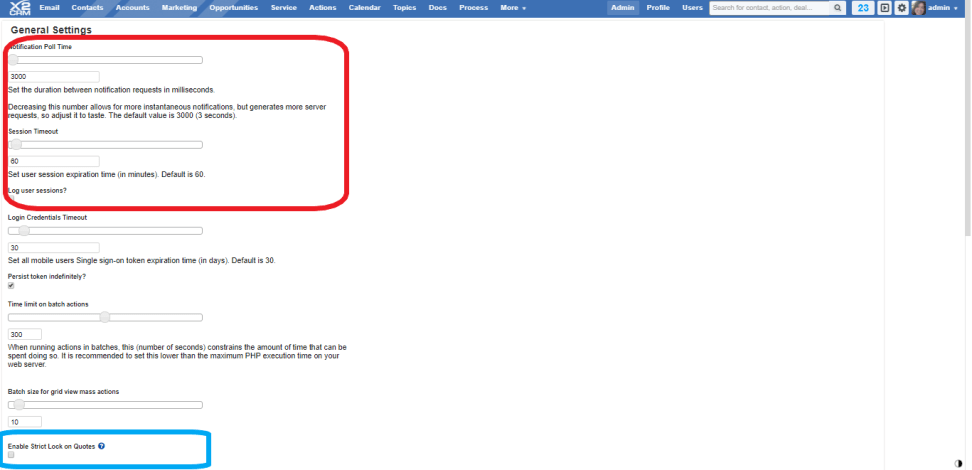

- The General Settings screen contains many parametrical settings. The first two options are both sliding scales, highlighted in the red box.
- Notification Poll Time is a measure of how often your server requests notification updates. The more frequent the requests, the more instant your notifications. Just make sure you’re happy with the balance of instant gratification to request amounts.
- The Session Timeout setting places a limit on the amount of time a user can be inactive on X2CRM before they are automatically logged out. In this case, when a user is inactive for 42 minutes or more, they will be logged out and will need to login to return. This helps mitigate the security concerns of leaving data up on an unattended computer, but if the timeout limit is set too low it’s also a good way to slightly annoy your users. Find a balance that’s right for you.
- Tick the Log User Sessions box to keep a record of your users’ time and activity on X2CRM.
- Enable Strict Lock on Quotes completely disables locked quotes from being edited. While this setting is off, there will be a confirmation dialogue before editing a locked quote.
- Allow Users to Backdate Actions enables backdating. Backdating allows any user to change the automatically set date fields (e.g. create date). That is, users can create and complete actions, workflow stages, and other events on dates that are earlier than the current one. This is useful if your sales staff want to log multiple stages of an already completed deal all at the same time. While this setting is off, only those with Admin access to the Actions module will be allowed to backdate actions. Set Access rules in the user management tab under administration.
- Changing the Action History Privacy limits which users can see which actions. Default will allow users to see actions which are public and/or assigned to them. User Only will only allow users to see actions assigned to them, Group only will allow users to see actions assigned to members of their groups.
- You may also enter a corporate address for your business
- The proper case names setting will attempt to capitalize contact names if they are not already capitalized (e.g. “leonardo da vinci” will become “Leonardo Da Vinci”). Here you may also set your default currency.
NEED MORE HELP?
Activity Feed Settings
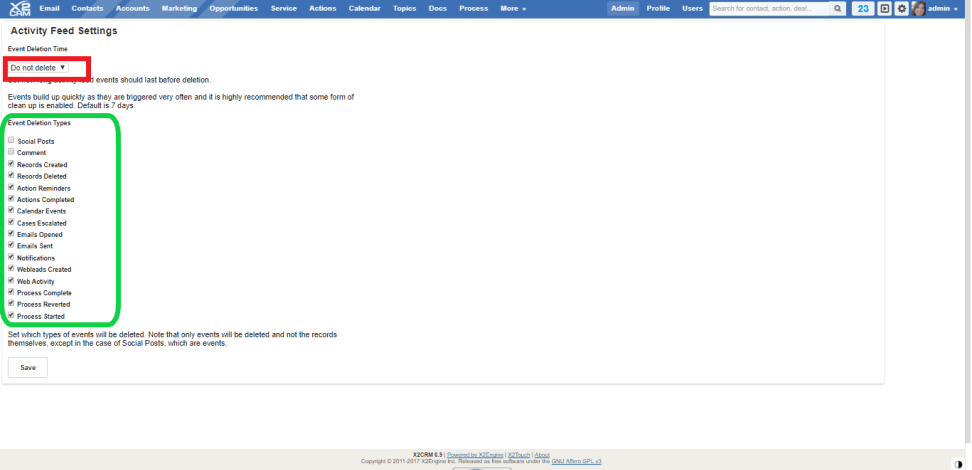
This setting affects how long posts last on your Activity Feed before they are automatically removed from it. This process does not delete the record of events, it simply unclutters the feed and keeps the post count manageable for you.
- Set the amount of time an event will last in your feed before it is removed from the dropdown menu highlighted in red. You may also set this to ‘do not delete’ if you so choose.
- Set which types of events this rule will apply to. Check off items from the list highlighted in green. Note that only events in your activity feed will be deleted and not the records themselves – except in the case of Social Posts, which are themselves events.
Security Settings
- Public Info Settings: Miscellaneous settings that control publicly visible data.
- Cron Table: Control the interval at which X2CRM will check for and run scheduled tasks.
- Location Settings: Enable location tracking and check-in posts, as well as configure specific settings such as tracking frequency and distance.
EMAIL CONFIGURATION
Email configuration is a somewhat technical process. It requires knowledge about transfer protocols, servers, and ports. As such, a more technical breakdown of all the terms and settings is available on the X2CRM wiki. This reference guide contains a less technically detailed manual/overview.
Email Client Settings: Configure timeout settings for IMAP functionality in the email client.
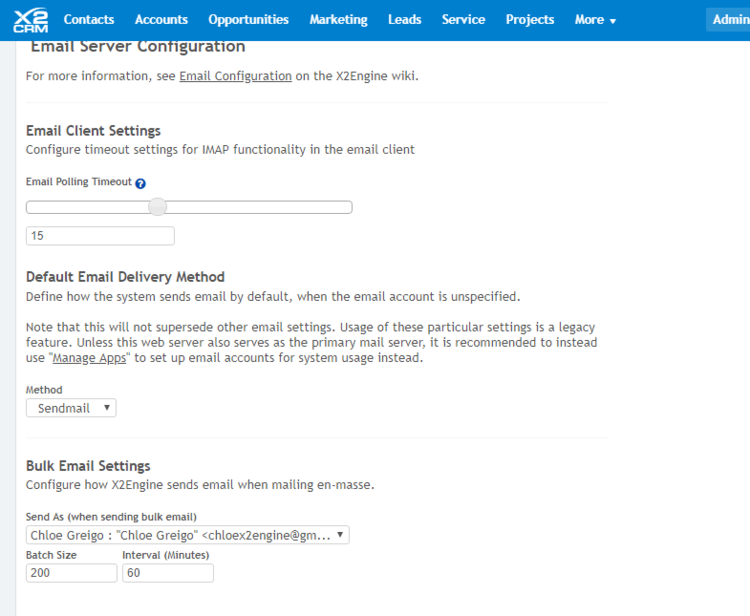
- Default Email Delivery Method: There are two options for sending methods: Sendmail and SMTP. Sendmail requires no additional set up. The SMTP option requires that you specify a hostname, port, security protocol, and an authentication.
- Bulk Email Settings: The ‘send as’ option brings up a drop down menu allowing you to set the default sending address for bulk email. The ability to connect an external mail service such as Gmail or Yahoo mail is available under manage apps within the profile menu Set details like sender name and the default batch email sending address. Place a soft limit on amount of bulk emails sent within a interval. Finally, decide what the bulk email signature will be.
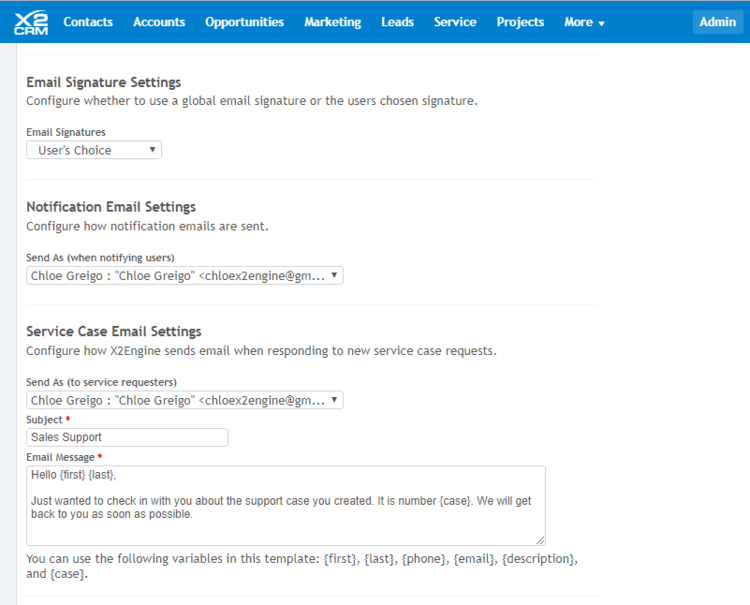
- Email Signature Settings: Choose whether to use a global email signature or allow users choice of signature.
- Notification Email Settings: This is a parameter for email announcements and notifications within X2CRM. Sometimes a user is sent an email notification of an event, e.g. a high profile web lead currently viewing your pricing page. Here you can stipulate what the email address will be that sends them that notification.
- Service Case Email Settings: When a client submits a service case request, they are automatically sent a response email. Here you can specify all sorts of details about what and who from that message will be.
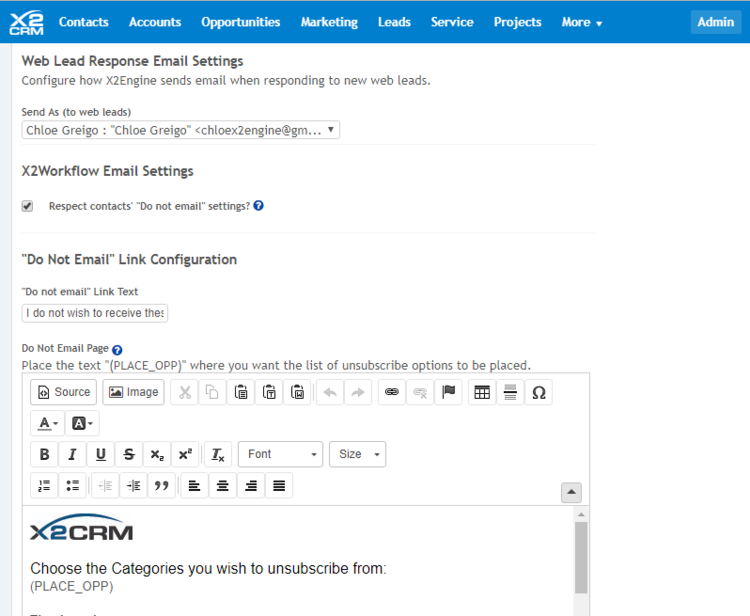
- Web Lead Response Email Settings: When a new web lead comes in via a web form, they can be automatically tagged and added to a newsletter list for instance via a workflow, and they can also immediately be sent a follow up email. Set the default sender address for web lead responses.
- X2Workflow Email Settings: Determine whether you want emails sent within an X2Workflow to respect the “Do not email” settings.
- “Do Not Email” Link Configuration: Create the text for the “Do not email” link and the display page when the “Do not email” is clicked. X2 allows the email recipient to choose a category to unsubscribe or unsubscribe from all. By placing “(PLACE_OPP)” somewhere in the text will present the list of categories to unsubscribe from. You can design how you want the page to look via this editor. To view how this page will look to the recipient view it in the Web Forms for Contacts section under Marketing.
- “Email Unsubscribed Page” Link Configuration: Create the text that will be displayed once a recipient clicks on the the unsubscribe. Notice images may be used in this message.
- In addition, there is a box to check to enable “unsubscribe” entirely.
- Default Email Delivery Method: There are two options for sending methods: Sendmail and SMTP. Sendmail requires no additional set up. The SMTP option requires that you specify a hostname, port, security protocol, and an authentication.
- Bulk Email Settings: The ‘send as’ option brings up a drop down menu allowing you to set the default sending address for bulk email. The ability to connect an external mail service such as Gmail or Yahoo mail is available under manage apps within the profile menu Set details like sender name and the default batch email sending address. Place a soft limit on amount of bulk emails sent within a interval. Finally, decide what the bulk email signature will be.
- Email Signature Settings: Choose whether to use a global email signature or allow users choice of signature.
- Notification Email Settings: This is a parameter for email announcements and notifications within X2CRM. Sometimes a user is sent an email notification of an event, e.g. a high profile web lead currently viewing your pricing page. Here you can stipulate what the email address will be that sends them that notification.
- Service Case Email Settings: When a client submits a service case request, they are automatically sent a response email. Here you can specify all sorts of details about what and who from that message will be.
- Web Lead Response Email Settings: When a new web lead comes in via a web form, they can be automatically tagged and added to a newsletter list for instance via a workflow, and they can also immediately be sent a follow up email. Set the default sender address for web lead responses.
- X2Workflow Email Settings: Determine whether you want emails sent within an X2Workflow to respect the “Do not email” settings.
- “Do Not Email” Link Configuration: Create the text for the “Do not email” link and the display page when the “Do not email” is clicked. X2 allows the email recipient to choose a category to unsubscribe or unsubscribe from all. By placing “(PLACE_OPP)” somewhere in the text will present the list of categories to unsubscribe from. You can design how you want the page to look via this editor. To view how this page will look to the recipient view it in the Web Forms for Contacts section under Marketing.
- “Email Unsubscribed Page” Link Configuration: Create the text that will be displayed once a recipient clicks on the the unsubscribe. Notice images may be used in this message.
- In addition, there is a box to check to enable “unsubscribe” entirely.
The email capture system is a technical feature made available for the more IT inclined. It provides the means for X2CRM to send email, natively, within the web application. When X2CRM receives mail it can automatically associate and log the message on the appropriate contact’s record. For a more specific and technical breakdown on the features and setup for this component, it’s highly recommended that you view the Email Configuration page on the X2CRM wiki.
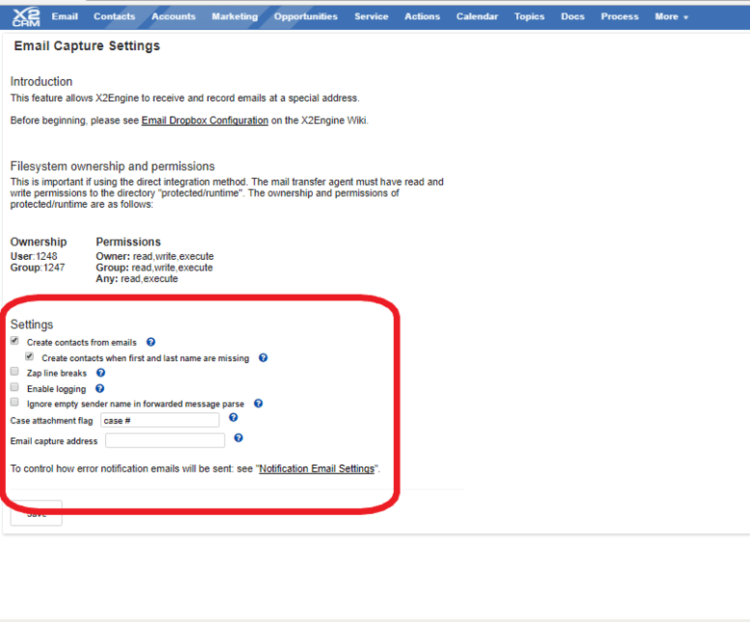
- The Email Capture settings, highlighted in the red box, break down as follows:
- Email Capture Address is the address to set as the sender when dispatching error notification emails. By default, if left blank, the email dropbox will use the first addresses in the To: or CC: field that contains “dropbox@”.
- The Create Contacts from Emails setting, if disabled, will cause the dropbox to ignore any emails that are to or from addresses not matching any contacts in X2CRM. If enabled, new contacts will be created automatically using name info contained in the email.
- Subsequently, the setting for Creating Contacts When First and Last Name are missing, if enabled, will cause the email dropbox to create a new contact record associated with a new unique email address even if the first and last name cannot be found in the email. If disabled, it ignores all email that does not contain contacts’ first and last names. This setting has no effect if “Create contacts from emails” is disabled.
- Zap Line Breaks, if enabled, will cause the mail parser (when extracting the body of an email) to attempt to clear the text of artificial line breaks induced by RFC email format specifications (which limit lines to 78 characters). If disabled, the email parser will not do this.
- Finally, Enable Logging, if enabled, will cause the email dropbox to record email capture events in a log file in protected/runtime. This option is useful for troubleshooting but will take up some extra disk space on a system that captures a high volume of emails.
- Create Email Campaign will take you to the Create Campaign screen within the Marketing module.
- Manage Campaigns simply takes you to the All Campaigns screen within the Marketing module.
- Convert Template Image: Fix dead image links in email templates resulting from the 5.2/5.3 media module change.
- Google Integration: Configure and enable Google integration.
- Twitter Integration: Enter your Twitter app settings for Twitter widget.
- Jasper Server Integration: Enter your Jasper Server settings for external reporting.
WEB LEAD CAPTURE & ROUTING
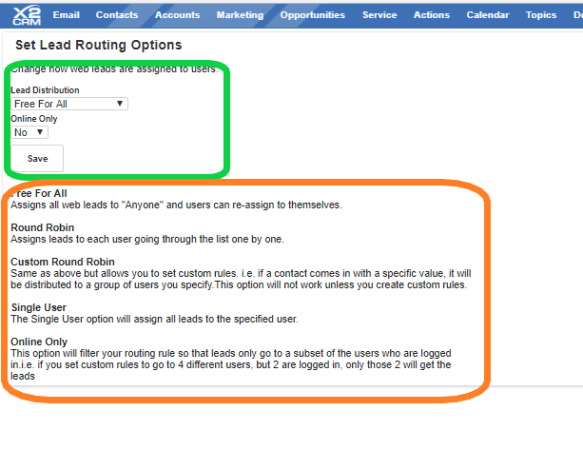
- The Set Lead Distribution option allows you to manage the lead filtering system.
- Select a lead distribution method from the drop down menu highlighted in the green box. The Online Only setting allows you to specify whether a user needs to currently be online or not in order to be sent a lead.
- There are multiple models for distributing new leads. Descriptions for these models are found in the area highlighted by the orange box.
- Free for all assigns the lead to ‘anyone’, meaning any member of your sales team can claim the lead. Round Robin cycles through a list of your sales staff until everyone has at least one lead. Then it cycles through the list again. Single user sends all leads to one member of your sales team. This is good for small sales teams.
- You may also set custom criteria for lead routing. Select Custom Round Robin and use Add Custom Lead Rules to specify your own rules for lead filtering:
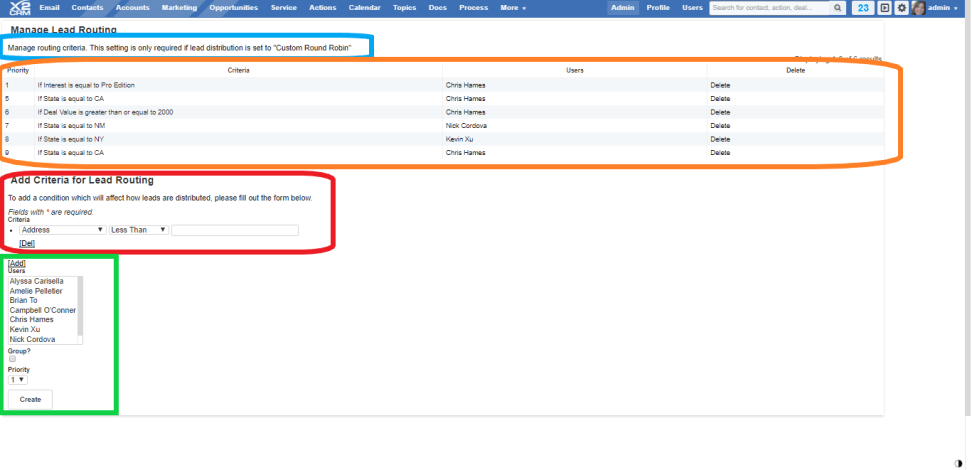
The Add Custom Lead Rules lets you specify how X2CRM will handle “Round Robin” lead assignments
- As indicated by the text highlighted in the blue box, this option is specific to the custom round robin setting.
- View a list of your current custom lead routing methods in the area highlighted by the orange box. It displays the criteria, the user, and the option to delete. It also displays its priority. If ever two lead routing rules conflict with each other, the one with the most prominent priority will be followed.
- For example, in this screen, the lead routing rule with priority 6 sends leads from California to Kevin Xu. However, the rule with priority 7 sends leads from California to Nick Cordova. The lead with priority 6 takes precedence over the lead with priority 7. Thus, Kevin Xu will be receiving those leads.
- Speaking of criteria, set a new rule with the conditions menu highlighted in the red box. click the [Add] option to set multiple criteria.
- Select the users to send the lead to in the the menu highlighted in the green box. To select multiple users hold down the control key as you click. You may also tick the Group option to instead select groups instead of users.
- Set the priority for your new rule and then create.
- The Service Case Web Form takes you to the create web form option in the service tab of X2CRM.

- The Set Service Case Distribution option, like Set Lead Distribution before it, allows you to specify how new service cases will be distributed amongst your service reps.
- The distribution types are described in the area highlighted in blue. The online only option limits the distribution to those users who are currently online.
- Select the distribution type and set online only status from the menus highlighted in green. Then save.
- Landing Page Designer links you to the landing page designer in the Marketing module.
- Web Tracker Setup redirects you to the web tracker setting page.
X2STUDIO CUSTOMIZATION TOOLS
The X2Studio takes customization in X2CRM to the nth degree. The X2Studio allows you to create new modules and edit existing ones. You can manage the content fields in each module. You can edit forms and layouts. In the X2Studio, you are crafting your X2CRM system to your own personal specifications.
X2Studio Customization Contents
Create a Module
Manage Fields
Dropdown Editor
Form Editor
Code Editor
Module Controls
Create A Module
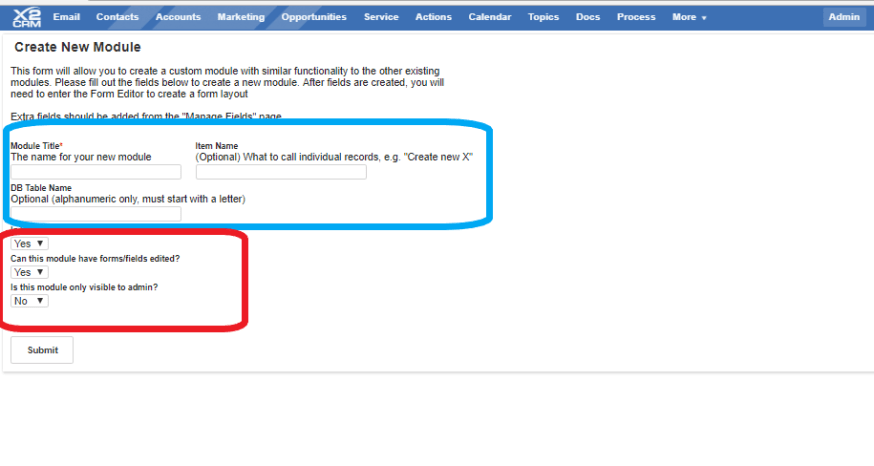
- On this screen you may create a new module. These are things such as your Actions tab along the top bar menu, your Contacts, Marketing, Opportunities and so on.
- Enter the naming information for the module in the name fields highlighted by the blue box. The standard module name is required. You can optionally set what a new instance in the module is called (for example, create a new X, where X is the instance within the module), and what its database name will be.
- There are a few drop-down menu settings highlighted in the red box. Set its searchability, editablity and visibility.
Manage Fields

- If you’ve created a new module, it – along with all standard and otherwise preexisting modules – will be available to edit within the Manage Fields option.
- There are three options for updating module fields, highlighted in the orange box.
- To add a new field to a module, click ‘add field‘. This option is shown in the screenshot to the right. Within the add a custom field option you must select the module you want to update. As shown in the area highlighted by the green box, you are required to add a name for the new field. The field name must not contain spaces. This is because what goes into the field name will ultimately become the name used in the dynamic variable that references the field (i.e. the name between the curly braces in e.g. ). Whenever you create a custom field name, it gets stored in X2CRM with a prefix, “C_”, which indicates “custom”. Thus, if you create a custom field name for your ice cream module called “iceCreamFlavor”, its dynamic variable will be “”.
- The label that users will see is the ‘Attribute Label’, also required. Select the data type for this attribute. Check off some further options, highlighted in blue. Choose whether this field will be required when creating a new instance of this module type, whether it must be unique (i.e. the attribute can’t match any others – useful for serial numbers or other ID), and whether it will return results in a search.
- The Remove Field option, the second of the three options in the orange box, allows you to delete created fields. All data in that field will be lost if you delete a field. Customize Field allows you to update parameters for all modules, not just ones you’ve created. So, if you want to make last names unrequired in X2CRM, you can edit the last names field in the contacts module and uncheck the ‘required’ box.
NEED MORE HELP?
Dropdown Editor
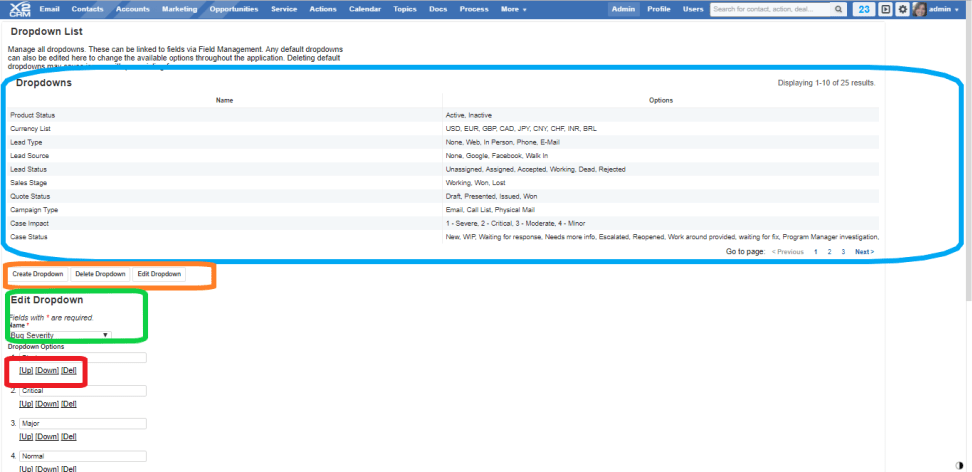
See a list of all current dropdown menus in X2CRM, shown in the area highlighted in the blue box. The dropdown name is paired with the content items in the list.
- There are three options for managing dropdown menus, highlighted in the orange box. The first allows you to create a new dropdown menu. The second allows you to delete a created menu (and only created menus, not ones that are standard to X2CRM).
- The third option allows you to edit an existing dropdown menu, standard or created. Select the name of the menu you wish to edit from the menu highlighted in the green box. You can edit the items in the list. Reorder items by moving them up and down the list with the [Up] or [Down] options, highlighted in the red box. You may also choose [Del] to remove the item. Additionally you can create new list items by clicking [Add Option], located right above the Save button near the bottom of the page.
- Tick the ‘allow multiple values’ option to let users select more than one item from the list.
- When you are satisfied with your dropdown menu, click the Save button highlighted in pink near the bottom of the page to finalize your changes.
Form Editor

The red box highlights some of the settings needed to edit a form. Select the module you’d like to edit the forms of. Modules have differing forms depending on your view type. There are different forms for viewing an existing module entry and for creating a new entry.
- There is an option to create a ‘New’ version from scratch. This will create a blank form, with all the available attribute fields in the righthand column labeled ‘field list’. Once created, the new form will appear in the Version dropdown menu. You can also make a ‘Copy’ of an existing form version, rename it, and then change it, so that you can create a new form without having to recreate every field row and column. You can also delete existing forms.
- When editing a form you have the option to tick the ‘default’ check boxes. ‘Default View’ is your default review of a module form. ‘Default Form’ is your default editing view.
- Click ‘add row’ or ‘add collapsible’ to create new areas in the form view. The row header contains the name of the row. For example, the row highlighted in blue is called ‘test field’. In the header you can use the [x] option to delete the row, rename it, and add or delete columns. You can of course drag and drop these fields to reorder them.
- Additionally, you can drag attributes from the Field List, highlighted in green, and drop them in any area of the form. Use preview mode to see what your form will look like. If satisfied, click Save to finalize your changes.
NEED MORE HELP?
Code Editor

- Develop and modify system source code.
- This is an enterprise only feature.
Module Controls
- Delete a Module or Page: Only admin-created pages and modules can be deleted. X2CRM standard modules cannot be deleted. They can, however, be edited and renamed.
- Export/ Import a Module: X2CRM allows you to export created modules as .zip files. To import, navigate to an X2CRM module zip file, select it, and import.
- Rename a Module: You can give created as well as standard modules new names in X2CRM. They will appear in your top bar menu with the updated name.
- X2Packager: Import and Export packages to easily share and use system customizations
- Convert Modules: Convert your custom modules to be compatible with the latest version
DATA IMPORT & EXPORT UTILITIES
X2CRM’s open architecture and unified database allow companies to have full access and control over every aspect of their Customer Relationship Management solution. In particular, X2CRM allows System Administrators and also CRM users the ability to Import and Export data as needed. This section walks through data management, including templates, tagging, and rollbacks.
CRM Data Import and Export Utilities Contents
Import & Export Records
How to Import or Export All Data
Using Tag Manager for Data Management
How to Rollback an Import
Additional Data Record
Import and Export Records

These options provide you a list to choose which module you want to import to or export from and it will take you to the Import/Export menu within the appropriate module.
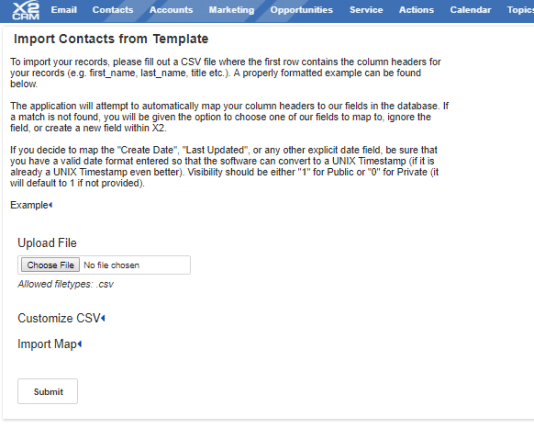
- Please have a look at our wiki page on importing contacts to see technical specifics about importing from .csv format.
Import and Export All Data
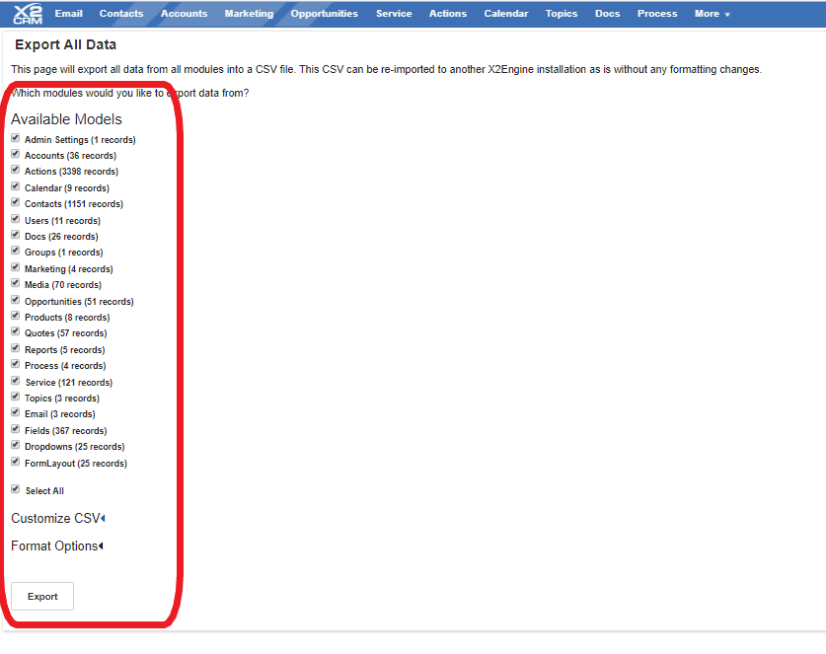
Export converts data in your X2CRM system into a single .csv file. You can consider this a type of backup if you like, but it’s also useful for easily importing data into another X2CRM installation, say, on your home computer.
- Please have a look at our wiki page on importing to see technical specifics about importing from .csv format.
- The modules you can export data from are filterable. Check off the models you want to export the record data from in the list highlighted by the green box.
- Once you have an X2CRM data .csv file, you can import it to another (or the same) X2CRM installation.
- The import option asks you if you want to overwrite any existing data or if you want to leave any existing data alone and simply add the import on top of that data.
NEED MORE HELP?
Using Tag Manager for Data Management

- The Tag Manager might more aptly be called the tag deleter. Here you can see an overview of all tags currently used within your X2CRM system.
- The manager gives you the ability to delete individual or all tags. Individual tags can be deleted by pressing the delete button in the far right column. You may delete all tags via the Delete All button highlighted in the orange box near the bottom of the page.
- Tags can be created at any time on a contact’s page by double clicking inside the tag field.
How to Roll Back an Import
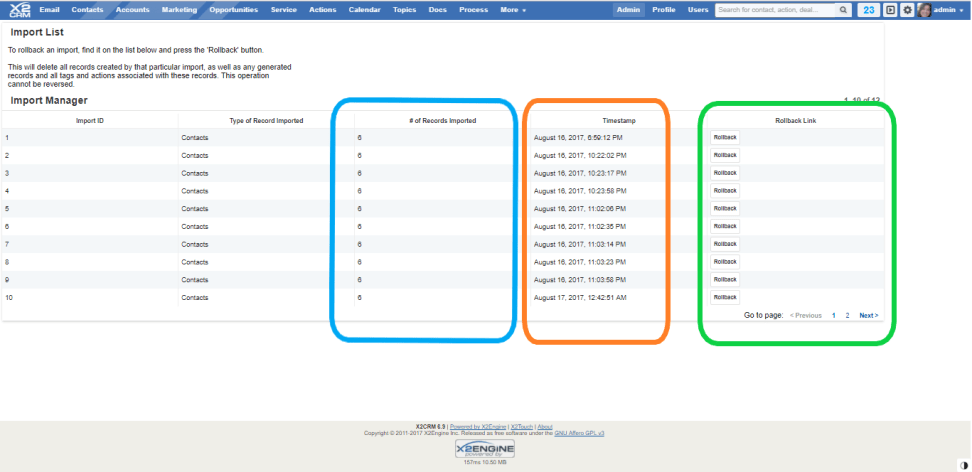
If you wish to undo an import, you can do so to some degree. With the import manager, you can view the date and time an import took place (highlighted in orange) for easy sorting. See the number of updated records, shown in the column highlighted in blue. When you find the import you want to undo, select the appropriate rollback button, found in the column highlighted in green.
The Rollback option deletes the records of a particular import. It does not undo any overwriting that import may have done. So, if you unintentionally selected ‘overwrite data’ upon import, you, unfortunately, cannot reverse that deletion. This is why it is advisable to be cautious when overwriting and importing data, as well as to keep good backups. But then, you probably already knew that.
Additional Data Management Record Tips
- Revert Merges : Revert record merges which users have performed in the app.
- Mass Dedupe Tool: View a list of all duplicates in the system and resolve them in bulk.
- Locate Missing Records: View a list of all hidden records of a particular type in the system.
USER MENU – X2CRM
The user menu provides your employees the tools needed to fully configure their individual X2CRM user account. Here, they can customize their theme (if permitted), manage their apps, and modify their account preferences such as notifications and visibility.
User Menu Contents
Profile
Notifications
Preferences
Manage Apps By User
Icon Reference
Help
About
Report A Bug
Go Invisible
Logout
Profile

- The profile page is a perfect snapshot of a specific user’s activity.
- The user’s general information, such as usernames, phone numbers, and email address can be found at the top of the profile page, outlined in red.
- If the user wants to update any of their general profile information, simply click the edit pencil icon in the upper right-hand corner, outlined in blue.
- The Google Maps widget will display the location of the user’s logins and check-in posts. This is a great way to see where a user has traveled to!
- The activity feed located on the profile page of a user is automatically filtered to only show posts or completed action belonging to or associated with that specific user.
NEED MORE HELP?
Notifications
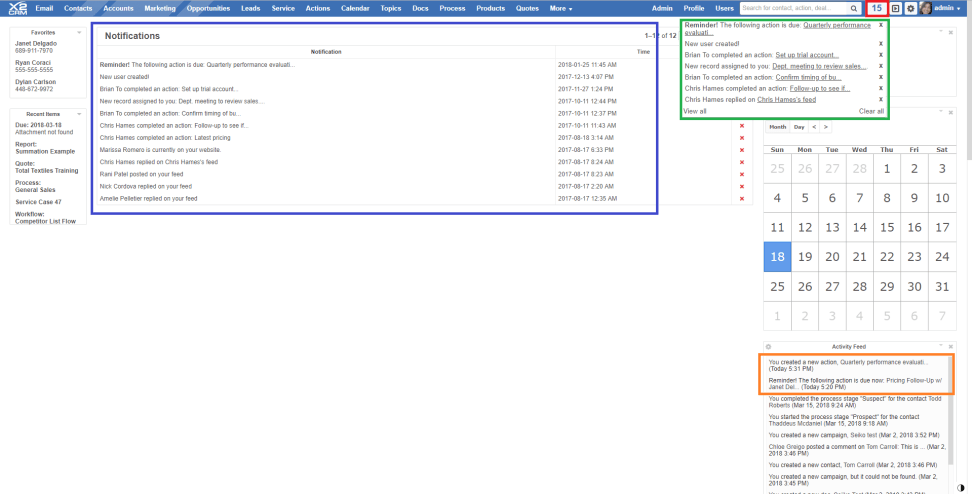
- The notification system in X2CRM places a blue number, highlighted in the red box, near the profile menu along the top bar. If you click this number, a small popup window displays your recent notifications, highlighted in the green box.
- When a notification occurs, it is also posted to the activity feed. On this image, the post is visible in the activity feed widget, highlighted in the orange box in the right-hand column.
- Notifications are also listed in detail when you click Notifications from the user profile menu. View a list of notifications, a description of the notification event, as well as the date and time of its arrival, outlined in the blue box.
- Remove individual notifications by clicking the red X next to its entry, or remove every notification by clicking ‘clear all’ from the grey Notification title bar, shown in the green box to the right.
Preferences

- Users can customize their personal settings and modify the look-and-feel of their X2CRM installation.
- With Preferences, users can make a variety of customization changes including modifying their X2CRM language, personal start page, time zone and theme settings. These settings are outlined in the green box.
- X2CRM’s theme studio is outlined in the red box. Here, users can customize themes and appearance (unless locked by the administrator) including color settings for backgrounds, menus, text, widgets, headers, and others.
- A collection of attractive background images are available out-of-box or users can upload their own background images.
- To upload an image to be the background of X2CRM, simply click on the blue upload icon next to the “Background Image” drop-down.
- An uploading toolbar will pop up at the bottom of the screen. Choose the file you would like to upload, select if the image will be public or private, then select upload.
- Once your image is uploaded into X2CRM, you can choose how the image will be displayed/tiled in the background using the “Background Tiling” drop-down.
- If you’ve set a personal background you’ll want to be able to see it! X2CRM has a small circle icon that resides in the extreme lower right corner of your screen, highlighted in yellow. If you click on it, it will hide your X2CRM windows (leaving behind the top menu) and show your background image in its full glory. To return to business, simply click the icon again and your screen will toggle back.
NEED MORE HELP?
Manage Apps

- You can connect third-party email services to X2CRM through Manage Apps. Our Quick Start Guide provides a detailed walkthrough on configuring various email clients, including Gmail and Gsuite accounts.
- The initial page contains a list of all your currently configured third-party accounts, as well as an ‘add new’ button and a drop-down menu at the bottom of the list. The drop-down menu contains numerous options, such as email domains, Twilio, DocuSign, X2HubServices and others.
- To make various accounts, such as your email, a default account, simply check the “Set as my default” option underneath the listed item.
Icon Reference
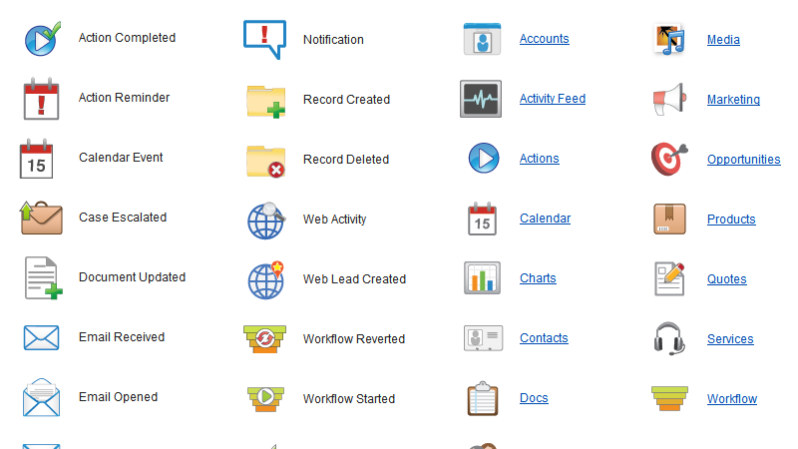
- This page contains an index of all icons in X2CRM and a description of their significance. Links are present where available.
NEED MORE HELP?
Help
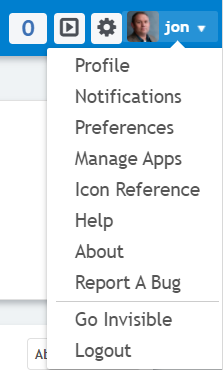
- The Help option from the profile menu brings you to the user reference guide.
About
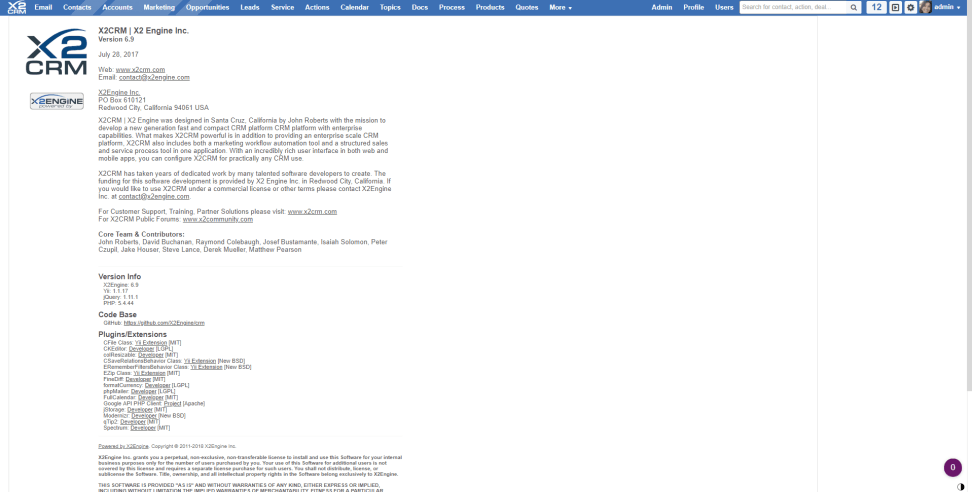
- The About page presents you with a brief histroy of X2Engine, the X2CRM team, and your deployment information.
NEED MORE HELP?
Report a Bug
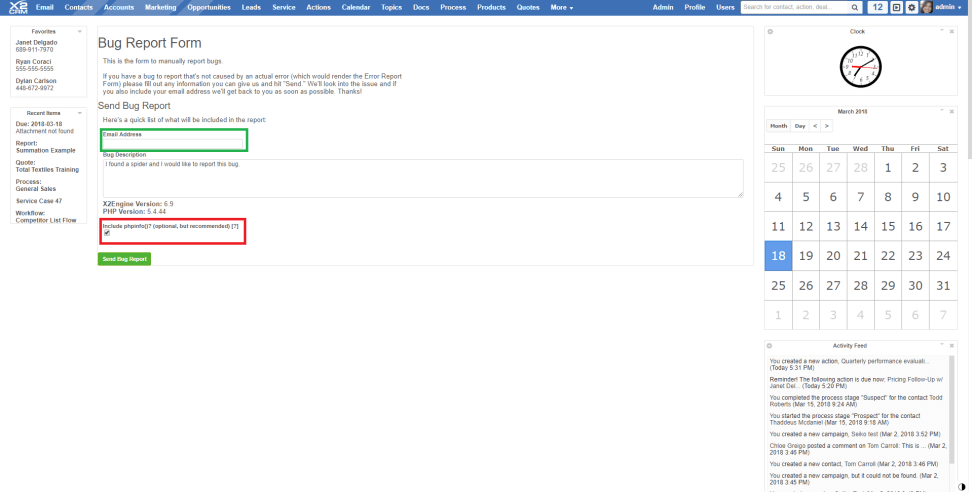
- As opposed to the bug report module from the top bar menu, which is meant to serve as an internal module for your company, Report a Bug allows you to contact us at X2 and inform us of any issues you are having with the software, or even requests for features you’d like to see in a future release of X2CRM.
- Enter your email address in the field highlighted in green to be kept updated of news related to the bug. We will email you when the bug is resolved.
- Enter a description of the problem. We recommend that when submitting the bug you include php mandatory server and PHP configuration information is very helpful for debugging purposes. Please note that the PHP submission can possibly contain sensitive information about your server’s configuration, so it is not mandatory to be sent with the report. However, it is extremely useful for us during the process of debugging and therefore we do highly recommend it. To include this information, simply tick the check box highlighted in red.
- Check out our support forums, X2Community.com, to view postings about past and current bug and fixes.
Go Invisible
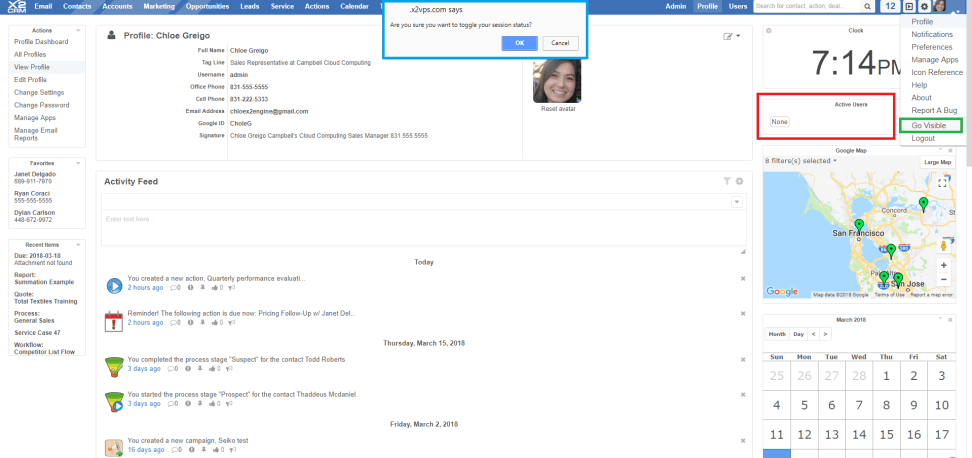
- Toggles whether you will be listed as logged on for other users of your X2CRM system to see.
- If you choose to go invisible, your browser will display a prompt, asking you to confirm your choice. This is outlined in blue.
- When you go invisible, no one will be able to see that you are logged on and currently using X2CRM. The Active Users widget, highlighted in red, will not display your name amongst the roster of users currently on X2CRM.
- After you have gone invisible, the profile menu will change and offer you the ability to go back to being visible, highlighted in green.
NEED MORE HELP?
Logout
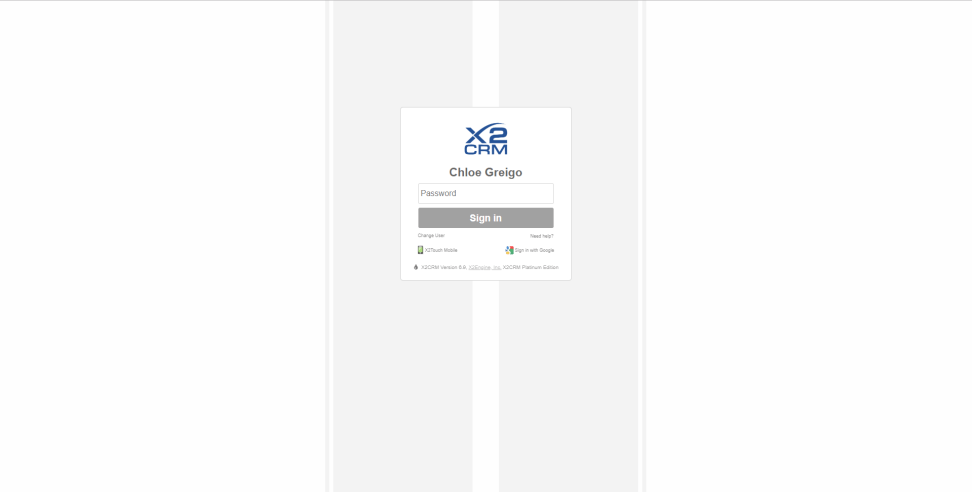
- Clicking this option ends your X2CRM session and returns you to the login screen.
- Until the next time.
GROUPS
Your X2CRM users can be organized into groups. Groups operate like a type of list, allowing you to quickly assign a new sales lead to a group of sales reps for example. Groups is a classification system which makes it easier for your team to handle business.
Create Group
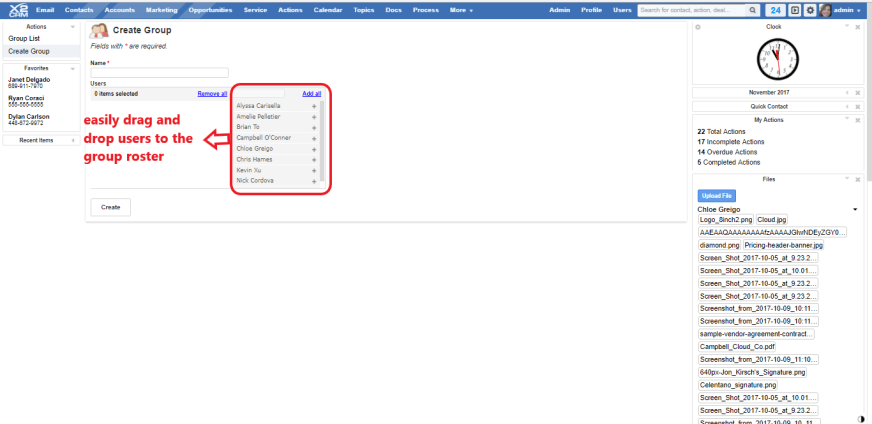
- You may want numerous types of groups for your team members. For instance, you might want to be able to group your sales reps, customer service staff, or accountants. Or perhaps you want to create some heretofore undiscovered group type. Luckily, creating a new group in X2CRM is quite easy. Simply enter a group name and populate the list with team members. You can click the + / – icons or simply drag and drop the appropriate users. You can also update this list later via the group detail view page.
Groups make it easy to assign specific tasks, calendar events, or even individual records to an entire team of people without having to manually assign them one by one.
SUPPORT
Sometimes things need fixing. Support cases are the instances of support and assistance that you and your company might be involved in with your clients. Our built-in service module is the perfect platform for your teams to manage service cases to keep your existing customers satisfied.
X2Support Contents
Service Case List View
Create Case
Create Service Web Forms
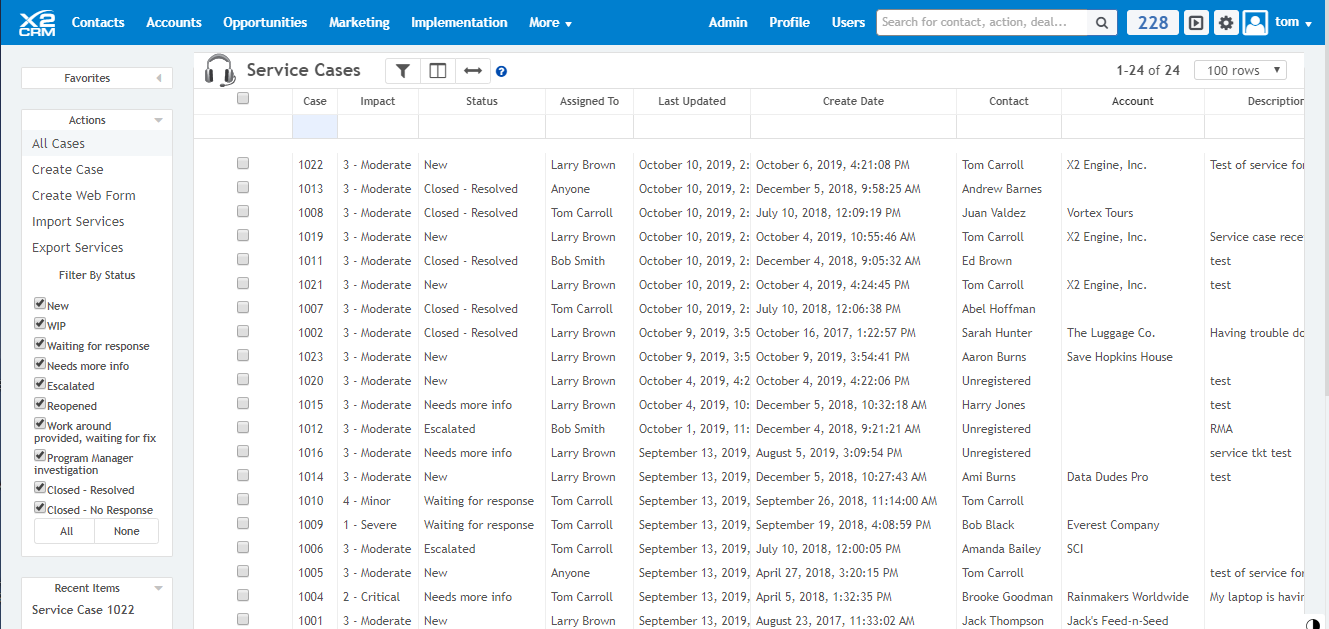
- The initial service screen displays a listing of All Cases, active and inactive. You can quickly filter out the inactive cases from your screen by un-checking the “closed” options in the “filter by status” menu in the left column. These are fast criteria for you to sort out service cases.
- You can add new columns via the columns button, . Check off the columns you want to see and un-check those you don’t. The columns are also sortable if you click on their title.
- Quickly reset the filters to their original state with the clear filter button,
- The impact column, displays a description of the severity of the service case. The impact scale is a 1 – 4 scale with 1 being the most severe. Though, like most things in X2CRM, this is customizable and editable within the admin tab. You and your service team can use this system to prioritize cases.
Create Case
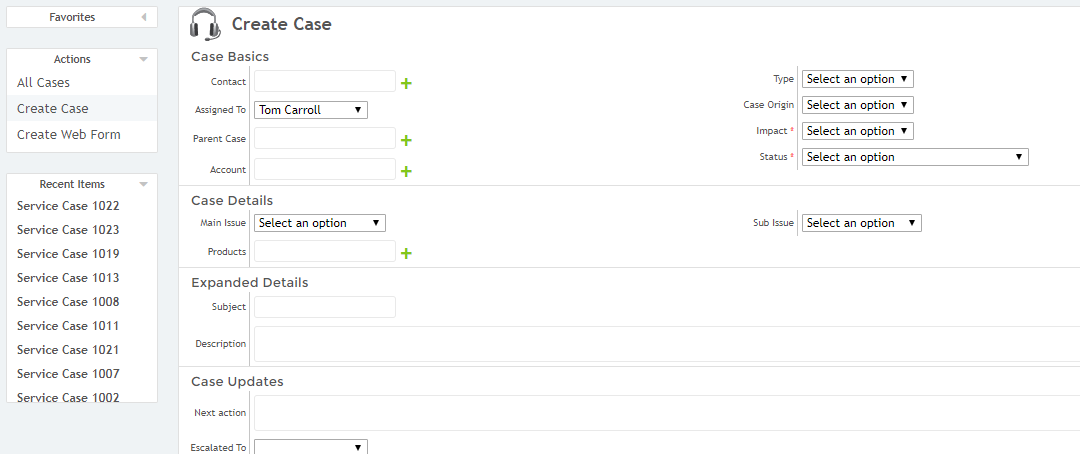
- Initiate a new service claim with the Create Case option. The case basics, include information about the service case, including the case contact. Start typing a contact’s name and auto suggestions will begin appearing. Alternatively if the claim is from a new contact, you can click the green plus next to the field to add a new contact.
- Other information includes the origin of the claim (e.g. web, phone request, etc.), current status, severity, whether it is a subcase of a previous claim, and the service representative it is assigned to. The case details contain dropdown menus with basic case classifications, like whether it is hardware related, for instance.
- Enter a subject and a description. Enter case updates, describing the next action phase of service. This is also updatable later on from the case detail view.
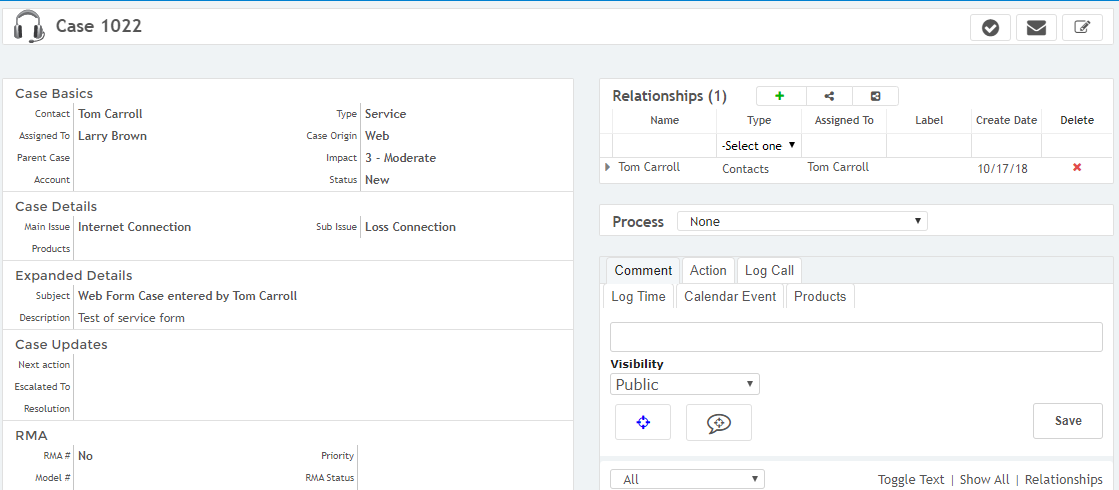
- Notice in the above example there is a field for Status and then under Case Details there is a Main Issue and a Sub Issue. These fields can be used to automatically create a Similar Solutions database. Once a Case is marked “Closed – Resolved” in the Status field, X2 will store these cases and when a new case comes in and the rep clicks on the Check Box in the upper right, a pop-up window will appear and present former Closed – Resolved cases which have the same Main Issue and Sub Issue. The window will display the Case # and what the Resolution was. When a service rep closes a case if they pay attention to a good description of what the Resolution was this will help in resolving future cases by the ability to display that within the Similar Solutions capability. See below for a sample of this.

Create Service Web Forms

- The Create Web Form module allows you to quickly and easily create a custom online service request form with no coding required.
- The settings, highlighted in green, allow you the visual customization necessary to integrate a streamlined web form into the theme of your site. Automatically add tags that will become associated with all the cases created via the web form.
- Customize the form. The red box in the middle of the page highlights the visual modification system. Drag and drop field items from the field menu. You can sort and rearrange the form options with simple mouse dragging. Set whether the field is required and its placement in the form. Preview the form and make sure its up to your standards.
- Shown in the blue box, you may also quickly name and save the form template for further future customization and usage within different contexts.
- Finally, grab the embed code, shown in the purple box, to copy and past it into your website.
BUG REPORTS
X2CRM has its own bug submission option where you can report X2CRM bugs to us should they arise (something we appreciate our users doing). The bug reports module on the other hand is for internal usage within your company. X2CRM offers the bug reports module as a base for you and your IT team to integrate it into your system should you need it.
Create Bug Report
- Bug Report List displays a list of all bug reports.
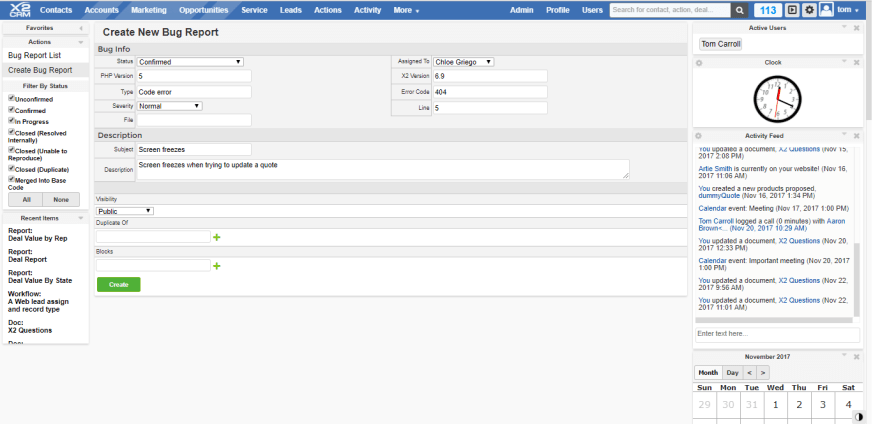
- The Create Bug Report option allows you to enter a information about a new bug into the system.
- There are fields for bug status and type, code environment, severity, and bug description.
- Set the visibility and whether it is a duplicate of a preexisting bug.
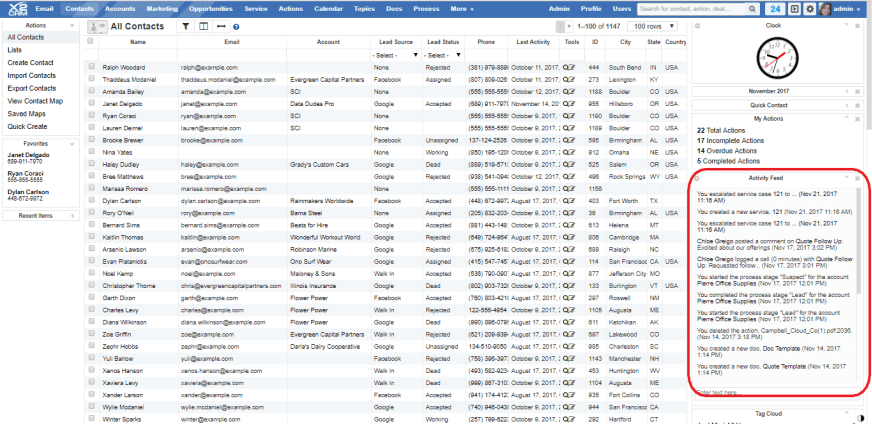
ACTIVITY FEED
The Activity Feed is an intracompany timeline that’s displayed on the Dashboard as soon as you log in and displayed in the far-right column when you access another module. The Activity Feed acts as a hub for all the activities your users or workflows have completed. It’s composed of notifications, social posts or location check-ins.
Activity Feed Contents
Activity Feed – Dashboard
Activity Feed – Widget
Activity Module
The Activity Feed is a very versatile and powerful communication platform within X2CRM. Aside from the notifications that broadcast within the Activity Feed, it can also act as a social hub for your business. Users can chat to each other through both public and private messages, location check-ins, and social posts. Important business announcements can also be pinned to the top of the activity feed so that they are always visible to users.
Activity Feed- Dashboard
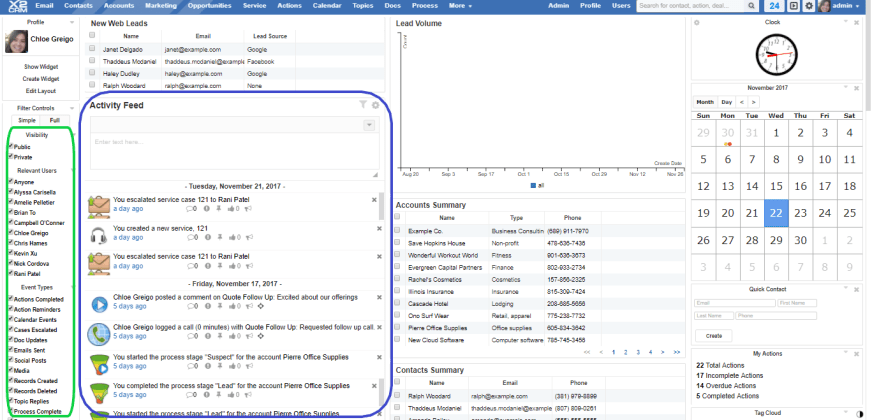
- The Activity Feed is visible as soon as you log in on the Dashboard, highlighted in blue. As with all the widgets in the Dashboard it may be moved anywhere within the middle two columns by simply dragging and dropping where you want it.
- Filters for the Activity Feed are highlighted in green. You may choose which users may see it and what activities should be displayed. Filters enable users to quickly find and see the post types that are most relevant to them.
- Many workflows have the option to automatically post updates or completion to your workflow automations on the activity feed.
Activity Feed – Widget
- The Activity Feed is available as a widget in the right column, where it resides when viewing modules other than the Dashboard. This is highlighted in red.
- With the Activity Feed widget, you’ll always be able to keep track of important conversations or notification within your business, even if you’re away from the dashboard.
Activity Module
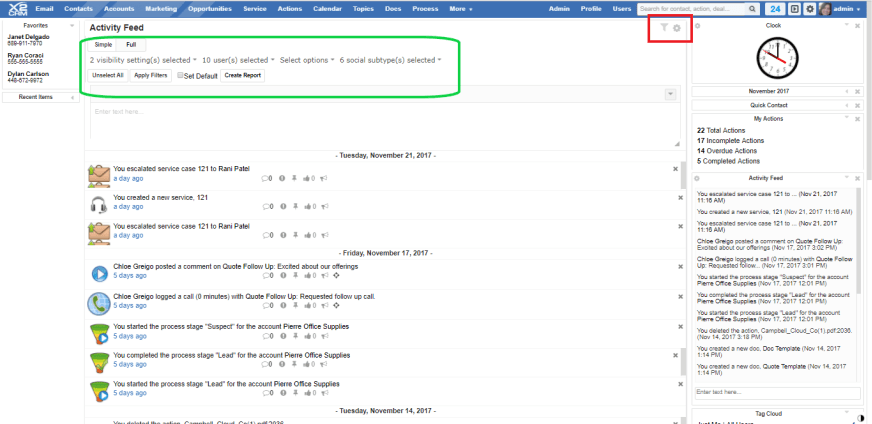
- The activity feed is also visible within its own module, named “Activity”.
- Within the Activity module, you can see a full screen view of all the same activity notifications that would normally appear within the Dashboard
- Like the Dashboard, the Activity module has a full set of filters that helps users navigate the activity feed to show only specific updates meeting specific criteria. The filters, highlighted in green, are triggered by clicking on the funnel icon, highlighted in red.
- You can set the view to be public or private. You can choose which users can view the feed. You can choose which options to show and what social subtypes to display. All of these options are chosen via the drop down menus next to each setting. Once selected click on Apply Filters to activate. Unselect All will set all filters to off.
- Create Report allows you to create a report based on the filters you have applied. You may give the report a name and choose a date range for the report. This will setup a report which will be emailed to you periodically.
X2PROCESS
Process workflows break down business processes into successive stages. Use the X2Process workflow to manage and keep track of your sales, marketing, and internal business processes. Easily develop custom sales and funnel processes to incorporate your unique methodologies into X2CRM.
X2Process Contents
List View – All Processes
Create Process
Process Detail View
List View – All Processes
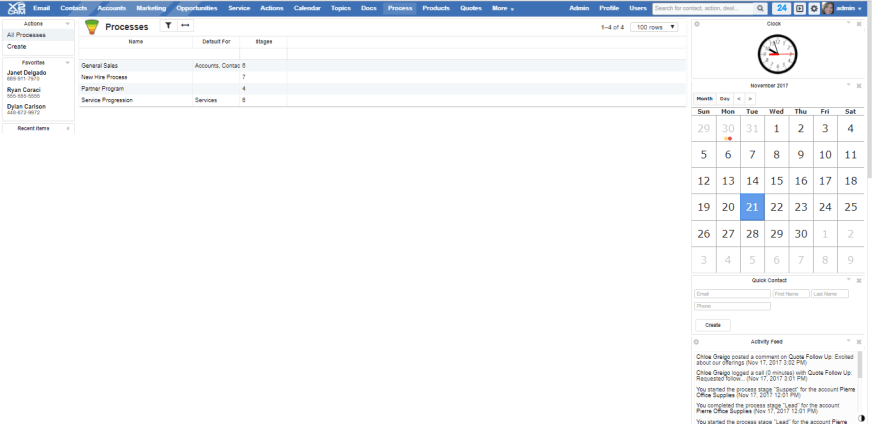
- See an overview of All Processes. Processes are grouped by categories. For example, processes can be used as a measure of the status of a sales relationship with a client. They can also be used to document the progress of a new employee, from ‘resume received’ to ‘schedule training’. Processes are highly customizable and can therefore be used in a number of different contexts involving staged progression.
Create Process
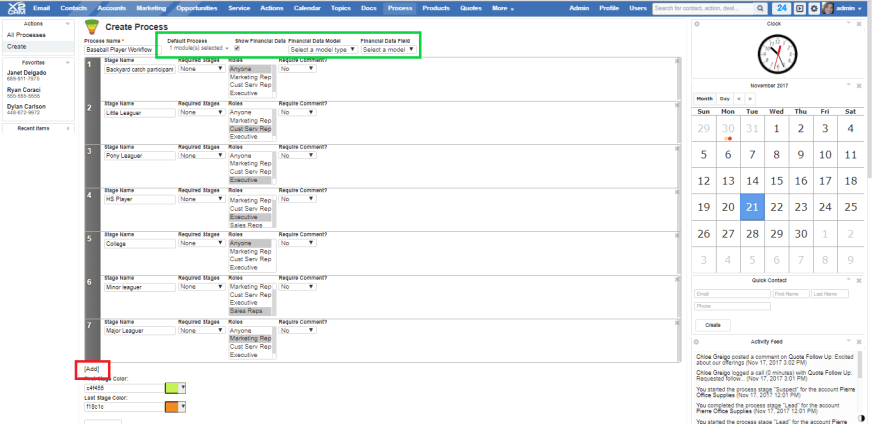
- Create a new process. Enter a name. Enter the process stages. 1 is the minimum amount. To create additional stages click the [Add] link near the bottom of the workflow window, highlighted in the red box.
- For each process stage, enter the information fields for name, prerequisite stages, role assignments, and whether comments are available.
- Click on the X icon in the top right corner of each process stage to delete it. Additionally, stages can be reordered via drag and drop.
- Decide whether to set this process as default for which modules by clicking the box near the top of the page, highlighted in green. Also decide if financial data is to be shown, choose the module to be used and what field. Once the process is completed, click the create button at the bottom.
Process Detail View
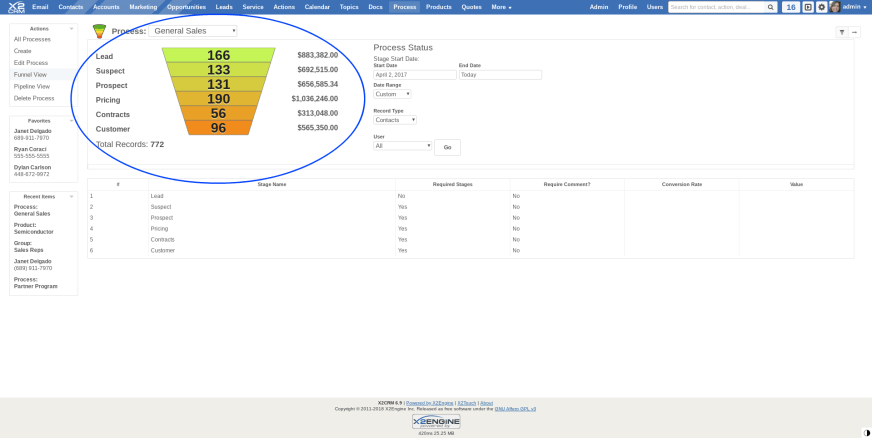
Process Funnel View
The process funnel diagram, highlighted in the blue circle, indicates the total number of people that are in each stage. Click on any stage to view a list of those people.
- Set a custom date range or select a preexisting one from the drop down menu
- Click on the options on the left hand column menu to manage processes. Edit or Delete Processes you are currently viewing.
- Users will be using the process that administrators create to keep track of each contact and manage their sales workflow.
- View the process associated with a contact on their page.
Process Pipeline View
- The process pipeline view shows a visual forecast of all stages within your company.
- Easily drag and drop contacts or deals to any stage within the process
- Anyone from sales representatives to executives can see all business deals and easily make ad-hoc changes.

X2WORKFLOW & PROCESS TOOLS
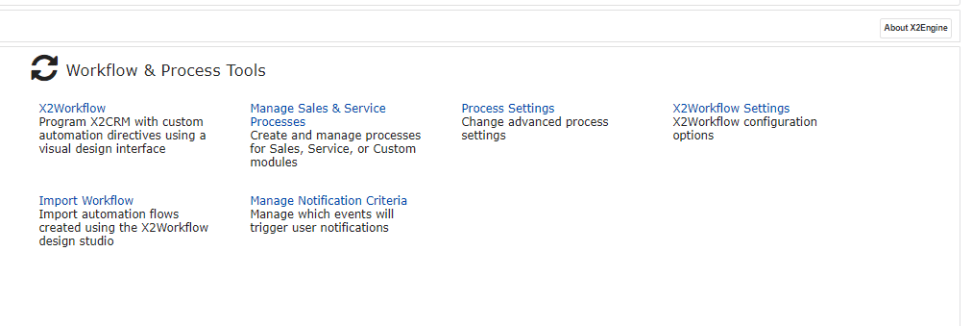
- X2WorkFlow takes you to the workflow module which shows a list of current workflows. Click here for more on X2WorkFlow.
- Manage Sales and Service Processes takes you to the Process module within the main X2CRM system. Here you can view and edit current Processes and create new ones.

- Process Settings takes you to a screen that sets the permissions for modifying processes within a certain time frame.
- The Process Backdate Window, highlighted in red, is the amount of time after the creation of a process that users have to backdate the process. Backdating is creating and completing process stages on dates that are earlier than the current one.
- The Process Backdate Range, highlighted in green, is the range of time that users are able to backdate processes within. This screen shows a process backdate range of one year. Therefore, a user can go to a process and create or complete a stage up to one year prior to the time that they are editing it. See the contact process section for more information on completing processes.

- The Manage Notification Criteria option will bring you to a system that creates filters for notifications. Here you can set triggers for notifying your users of certain events.
- The model type that you select will choose the module that supplies the data for the trigger events. Choose a field from within the model from the drop down menu highlighted in the blue box.
- The comparison operator and model value fields allow you to choose how you want to evaluate the data in that field.
- Choose the users to notify from the drop down menu highlighted in green.
- Select the notification type. You can create an action for the user, change the assignment of the record to the specified user, or simply send them a basic notification within X2CRM.
- View already created event filters in the area highlighted in the orange box. The notification criteria highlighted here contain rules that feature the three different types of notifications.
- This sort of notification filter can be done easily in this module but can also be handled by X2Flow, with even more customizability.
- X2Workflow Settings configuration options for X2Flow. Allows you to set the maximum number of trigger logs.
- Import Workflow links to the X2Flow import workflow option within X2Flow. Click here for more on X2Flow.
X2WORKFLOW
X2WorkFlow is a powerful, highly customizable marketing automation module that allows marketers to build preprogrammed marketing campaigns based on customer behaviors.
X2Flow is a powerful and intuitive tool, hefty enough to deserve its own reference guide. Check out the X2Flow in-depth documentation page:X2FLOW IN-DEPTH DOC
Alternatively, for a broader overview, check out the X2Flow feature spotlight:X2FLOW FEATURE SPOTLIGHT
X2WORKFLOW MANUAL
Welcome to the X2WorkFlow Manual!
About X2WorkFlow
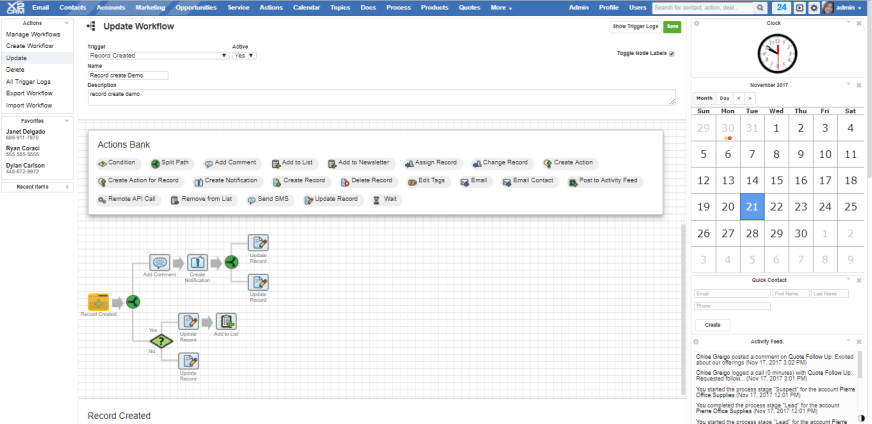
The universal workflow engine and progress report focus on what your business needs to accomplish.

X2WorkFlow is an easy-to-use, drag-and-drop workflow designer and engine that is included with every version of X2CRM. With X2WorkFlow, users can leverage all the data within X2CRM to easily model both simple and complex process flows. You start by selecting a “Trigger”, such as “Campaign Web Activity”, along with any associated conditions that must be met before any flow is activated. Then you simply drag-n-drop actions that will be automatically performed whenever the Trigger conditions are met, and configure parameters associated with each flow action.